A lot of the devices that we will use to connect the Banana Pi communicate with the Banana Pi through the IC2 bus
For Lubuntu, we will have to install I2C support before we can do that.
sudo apt-get update
sudo apt-get install i2c-tools
sudo apt-get install git build-essential python-dev python-smbus
git clone https://github.com/LeMaker/RPi.GPIO_BP -b bananapro
cd RPi.GPIO_BP
sudo python setup.py install
Raspian comes with some of the device oriented software installed.
GPIO:
root@lemaker:~# gpio readall
+-----+-----+---------+------+---+--Banana Pro--+---+------+---------+-----+-----+
| BCM | wPi | Name | Mode | V | Physical | V | Mode | Name | wPi | BCM |
+-----+-----+---------+------+---+----++----+---+------+---------+-----+-----+
| | | 3.3v | | | 1 || 2 | | | 5v | | |
| 2 | 8 | SDA.1 | ALT5 | 1 | 3 || 4 | | | 5V | | |
| 3 | 9 | SCL.1 | ALT5 | 1 | 5 || 6 | | | 0v | | |
| 4 | 7 | GPIO. 7 | IN | 0 | 7 || 8 | 0 | ALT0 | TxD | 15 | 14 |
| | | 0v | | | 9 || 10 | 0 | ALT0 | RxD | 16 | 15 |
| 17 | 0 | GPIO. 0 | ALT4 | 0 | 11 || 12 | 0 | IN | GPIO. 1 | 1 | 18 |
| 27 | 2 | GPIO. 2 | ALT4 | 0 | 13 || 14 | | | 0v | | |
| 22 | 3 | GPIO. 3 | ALT4 | 0 | 15 || 16 | 0 | IN | GPIO. 4 | 4 | 23 |
| | | 3.3v | | | 17 || 18 | 0 | IN | GPIO. 5 | 5 | 24 |
| 10 | 12 | MOSI | IN | 0 | 19 || 20 | | | 0v | | |
| 9 | 13 | MISO | IN | 0 | 21 || 22 | 0 | ALT4 | GPIO. 6 | 6 | 25 |
| 11 | 14 | SCLK | IN | 0 | 23 || 24 | 0 | IN | CE0 | 10 | 8 |
| | | 0v | | | 25 || 26 | 0 | IN | CE1 | 11 | 7 |
| 0 | 30 | SDA.0 | ALT4 | 0 | 27 || 28 | 0 | ALT4 | SCL.0 | 31 | 1 |
| 5 | 21 | GPIO.21 | IN | 0 | 29 || 30 | | | 0v | | |
| 6 | 22 | GPIO.22 | ALT4 | 0 | 31 || 32 | 0 | ALT4 | GPIO.26 | 26 | 12 |
| 13 | 23 | GPIO.23 | IN | 0 | 33 || 34 | | | 0v | | |
| 19 | 24 | GPIO.24 | IN | 0 | 35 || 36 | 0 | IN | GPIO.27 | 27 | 16 |
| 26 | 25 | GPIO.25 | IN | 0 | 37 || 38 | 0 | IN | GPIO.28 | 28 | 20 |
| | | 0v | | | 39 || 40 | 0 | IN | GPIO.29 | 29 | 21 |
+-----+-----+---------+------+---+----++----+---+------+---------+-----+-----+
| BCM | wPi | Name | Mode | V | Physical | V | Mode | Name | wPi | BCM |
+-----+-----+---------+------+---+--Banana Pro--+---+------+---------+-----+-----+
I2C:
root@lemaker:~# ls /dev/i2c*
/dev/i2c-0 /dev/i2c-1 /dev/i2c-2 /dev/i2c-3 /dev/i2c-4
root@lemaker:~# ls -l /dev/i2c*
crw------- 1 root root 89, 0 Jan 1 2010 /dev/i2c-0
crw------- 1 root root 89, 1 Jan 1 2010 /dev/i2c-1
crw------- 1 root root 89, 2 Jan 1 2010 /dev/i2c-2
crw------- 1 root root 89, 3 Jan 1 2010 /dev/i2c-3
crw------- 1 root root 89, 4 Jan 1 2010 /dev/i2c-4
Install I2C tools:
sudo apt-get install i2c-tools
Now you can run
sudo i2cdetect -y 1
or
sudo i2cdetect -y 2
If your I2C device is found, you will see it in the output.
For example, the Adafruit BPM180 pressure and temperature monitor board:


If everything is connected correctly,
sudo i2cdetect -y 2


If everything is connected correctly,
sudo i2cdetect -y 2
will give you
bananapi@lemaker ~ $ sudo sudo i2cdetect -y 2
0 1 2 3 4 5 6 7 8 9 a b c d e f
00: -- -- -- -- -- -- -- -- -- -- -- -- --
10: -- -- -- -- -- -- -- -- -- -- -- -- -- -- -- --
20: -- -- -- -- -- -- -- -- -- -- -- -- -- -- -- --
30: -- -- -- -- -- -- -- -- -- -- -- -- -- -- -- --
40: -- -- -- -- -- -- -- -- -- -- -- -- -- -- -- --
50: -- -- -- -- -- -- -- -- -- -- -- -- -- -- -- --
60: -- -- -- -- -- -- -- -- -- -- -- -- -- -- -- --
70: -- -- -- -- -- -- -- 77
sudo apt-get install git build-essential python-dev python-smbus
git clone https://github.com/adafruit/Adafruit_Python_BMP.git
cd Adafruit_Python_BMP
sudo python setup.py install
To run the example:
cd examples
sudo python simpletest.py
If you get a communication error message, it is possible that the simpletest.py code has the wrong bus number hard-coded.
In the above example, the module was found on bus 2, but the code is set for bus 0. Fix this by changing
#sensor = BMP085.BMP085()
In the above example, the module was found on bus 2, but the code is set for bus 0. Fix this by changing
#sensor = BMP085.BMP085()
to
sensor = BMP085.BMP085(busnum=2)
In my case, that fixed it and I got the following output:
Temp = 25.10 *C
Pressure = 98167.00 Pa
Altitude = 266.13 m
Sealevel Pressure = 98174.00 Pa
Permission Problems
If you want to access I2C devices via Python, you need the appropriate permissions to access the I2C subsystem. You can run the program as superuser
If you want to be able to access I2C devices without having superuser privileges, you can add yourself to the i2c group
sudo adduser bananapi i2c
After logging out and back in, you will be able to access I2C devices
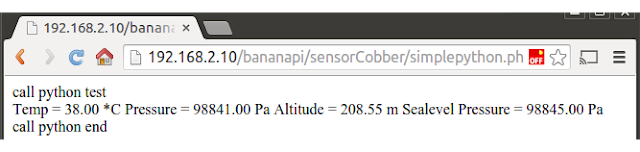
Similarly, by adding the www-data user to the i2c group, a web page will be able to access the I2C devices via Python and PHP.
sudo adduser www-data i2c
For some reason, logging out and back in did not seem to work. However, after rebooting, the web page was able to access I2C devices.
sudo python BMP180_test.py
If you want to be able to access I2C devices without having superuser privileges, you can add yourself to the i2c group
sudo adduser bananapi i2c
After logging out and back in, you will be able to access I2C devices
python BMP180_test.py
sudo adduser www-data i2c
For some reason, logging out and back in did not seem to work. However, after rebooting, the web page was able to access I2C devices.

No comments:
Post a Comment